Compression
Compression is used to control the Dynamic Range of a signal. Dynamic Range is the distance between the loudest part of a signal and the quietest.
Parameters
A compressor is like a "dynamic limiter", you still define a Threshold volume over which a signal shouldn't go, but instead of just cutting it off at the threshold, a compressor will turn down/up the frequencies based on how far over/under the threshold they are.
How aggressive or relaxed it is with reducing that volume is defined with the Ratio parameter. How long it takes to start compressing is defined using the Attack, and how long it takes to stop working is defined using the Release.
Usually there is also Make-up gain (remember that gain is just a synonym for volume), which is used to bring the gain back up after it has been compressed, as compression reduces the overall volume.
If you want a little intro into how these parameters actually affect the sound, there is a Video by Gregory Scott that goes into how to listen for these changes.
Use Cases
Controlling the Volume of Elements
In this case, we reduce the Dynamic Range by making the loudest parts quieter, and then bringing up, the now quiet signal, to a usable level using the make-up gain. Now, the lowest and quietest parts of a signal are closer together, thus having a lower dynamic range.
If you record the voice of a singer, some part of their performance might have to be sung at the top of their lungs while others may have to be whispered. You can use compression to bring everything to one place.
Emphasizing Transients on Signals
If we turn up the Attack of the compressor, it won't touch the initial punch of a sound, but will turn down the trail of it.
We have a drum sound and want to make it hit harder/sharper, we can turn up the attack so that the compression hits right after the transient.

Gluing Groups of Elements together
We have elements in a group (e.g.: a kick, hi-hat and snare), but we want them to sound a bit more congruent, we can use a compressor on the entire group to make them sound a little closer.
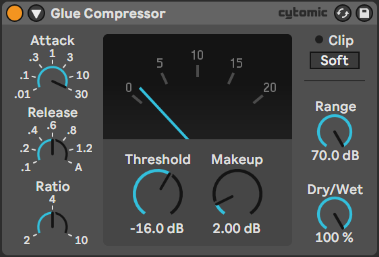
- Get an instance of Ableton's "Glue Compressor" onto your group.
- Set the Attack & Release to their lowest possible value.
- Overexaggerate the Threshold so that you can clearly hear the difference. (Something like 10db of gain reduction)
- Play with the Attack & Release until you find a sweat spot.
- Turn the threshold back down again. (Something like 5db of gain reduction)
- Adjust the markup gain to the average gain reduction
Parallel Compression for More Body
We can add a bit more body/"meat on the bone" by adding leave the original signal, but also adding a second layer of the same signal with quite heavy compression on it. This can be done through Parallel Processing, or with the Dry/Wet parameter of the Compressor.
Upwards Compression
So far, we've only done Downwards Compression, which turns down the too high frequencies. But we can also have Upwards Compression which defines a bottom threshold where the too quiet frequencies are turned up.
This is useful if the life of the signal lives more in the upper end of the frequencies, and we want to preserve that.
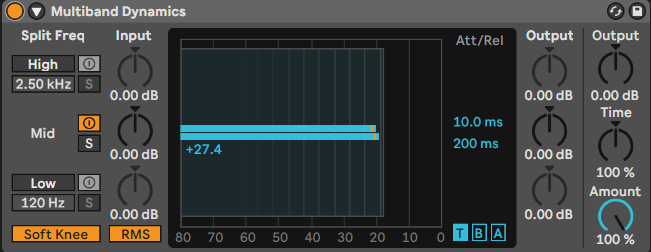
For this, we have to use the "Multiband Dynamics" Effect, but we're going to forget about the "Multiband" part by disabling the high and low frequency bands:
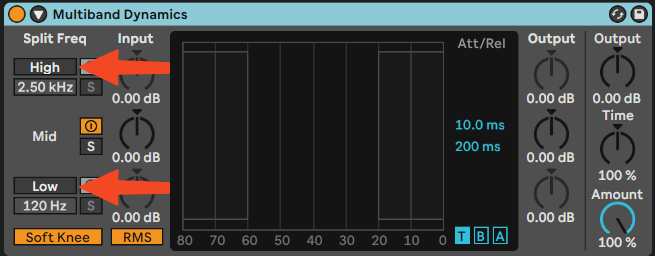
Now we can drag the edges of the left block left/right for the Threshold and up/down for the Volume of the effect.
Relevant Note(s): Composition